I *love* this sloper. The first time I measured the pants, I was a little too tight on my measurements, as my toddler is transitioning from cloth diapers to cloth unders. So, the measurements can be different depending on what the toddler is wearing. I did finally pick a pattern to make *all* the unders for, then measured with those on. That worked great! As my model ran around the house yelling "mama made it!" (even though the sloper test was in horrid purple gingham), I knew it was successful.
The toddler measurements are small, given that the toddler is 5th percentile for weight (at age 2), which means things are just too big, in general, except for the major bulk of cloth diapers. Hence, the need for a major wardrobe overhaul.
Pants sloper: success!
Changes: only did a 1/2" SA, as more reasonable for me with children's wear
Skirt sloper: changes to include high rise on toddler's back, due to Buddha belly in front, which pushes all clothing down a full 2" (compared to back)
I will be working these slopers up with my mass collection of Oliver + S patterns, to make them more custom-made. Super happy to have custom slopers, though.
Glenda's booklet for drafting clothing from the slopers is superb. If I had the energy to be creative, I'd pounce! As is, I'll leave the creativity up to Liesl, for the time being. :)
Friday, March 9, 2012
Wednesday, March 7, 2012
Muslin Critique (Round One)
I sewed up my first muslin, and for the most part, I'm super happy!! There are a few areas I need to address, listed below:


- Front and side view of legs
- My left thigh is a full 1/2" bigger (two inches down from crotch line) than the left
- My right out seam is a full 1/4" shorter than the left
- I feel like there is a tight pull right below the largest bulge on the left thigh, not as much so on the right, but still a tiny bit
- Waist
- Thus far, perfect!
- Was I supposed to add the 5/8" seam allowance at the top? It created excess fabric (since I chose to not add a waistband), but I still feel super pleased!!
- Rear View
- For what I've been blessed with, I think it looks great! The back *definitely* looks better than the front.
- I need to make two separate front/back leg patterns (four pant patterns total), to accommodate separate height and thigh issues.
- I think the "pull" right below the bulge is due to the different height of my legs, and larger left thigh. I will re-align with master pattern and correct these situations, then true-up and hopefully that will take care of the issue.
- With the back view looking so much better than the front, I hope that those changes will correct the front to look as well-fitted
- I don't love the accentuated view of my front thigh, from the side view---I think it's because I tucked in the high hip, since my hip hip is so narrow
- I've realized that though my hips are bigger in the back than front (big bootie), my thighs are equal front/back, which means I need to re-align that part of the pattern, as well
- I *really* dont' like the tapered look on the legs---but, I want to like it, so I think it may have to do with the unbalanced thighs??


Sunday, March 4, 2012
Sure-Fit Designs: First Impressions & Experiences
Keeping personal notes of my experiences with personal sloper drafting using the Sure-Fit Designs Solution.
Basic intro: My mother sewed most of my clothes until about the age of 12. I majored in Fashion Design at college, with a firm passion for flat pattern design. I can (and LOVE) to make anything from a sloper, but I haven't had my own well-fitted sloper for over 15 years! My fitting partner was a male, so I never had the opportunity to be taught to draft a female sloper from scratch (as my partner made mine). SO, here I am, a certified designer, who can make any design with paper and pencil…and yet, I can't even fit myself very well!
Measurement Chart:
1. Waist = F16, B14 1/2
2. High Hip (3" down)= 35 1/2
3. Low/full Hip (8.5" down)= F19 1/2, B21
4. Pant Length= 40.5"
5. Crotch Inseam= F11, B14.5
Right off, you can see that I have a full hip, with small waist. Though, smaller hips with larger belly in front (post-baby bump) with larger hips and smaller belly in back. Out of the box, I'm generally a size 8, but when broken down, a good sloper will definitely make a difference!
*******************************************
I've had the kit for several months, admittedly. I watched a live seminar that was presented by the ASG. I loved it, and bought the Dress, Shirt & Pants Kit immediately. For the past week, I've been trying to fit my toddler's size to make some unders, but I've had a hard time fitting the toddler-Buddha belly. I read some great reviews about the Children's supplement kit, so purchased that today. Then I realized, perhaps I'd better make sure this works with me, before I plunge into my toddler's!
I flipped through the pants book to get an idea what I'm going to be doing…I was nervous, since it seems *too* easy (coming from someone who geekishly loves making patterns with rulers, pencils and blank paper), but loved the idea of the simplicity! After toddler was in bed for the evening, I began taping the basic sloper to the table along with the vellum. As I read and re-read the first part of finding the cross-point of the back crotch and waist width, I was a little lost…did I mention I'm a visual person??
I then remembered *loads* of reviews that people had watched the included DVD as they drafted, pausing at each step. I revved up the DVD player, and wow. Glenda is thorough!! Doing my sloper step-by-step with the video was better than I had hoped for!! I ran back/forth to the TV and table to make the back sloper, then easily plunged the front sloper. At that moment, I realized (doh!), I'd forgotten to take into account my very different F/B waist & hip measurements. I plunged ahead with the front sloper, using only the front measurements, intending to go back and alter the back sloper soon. (Note: see page 6 of the Pants booklet to refer to dramatically different front/back measurements, such as my crotch, waist and hip measurements, and how to apply to F/B sloper---SUPER helpful).
As I was doing the front sloper, thinking of the changes I had to make to the back sloper, I realized…"this is SOOO easy!! why would I alter the back sloper? I'll just make a new one!" And that I did. Because, really---it's just that easy. I really believe it would have taken me longer to re-align the back sloper to the basic draft and try to erase/re-do the lines. That right there made it totally worth it to me!
Loving: the ease, the simplicity, the directions, sketches, images, and DVD!
Changes: as I did the front sloper, I did the SA right along with the outline drafting (easier for me)
Tomorrow…round one of the fitting (using 1" grid gingham fabric so I can make sure the hang is correct).
Tuesday, August 31, 2010
Feng Shui and Being a "Selfish" Hippie
While reading Whole Living (Martha Stewart's previous "Body + Soul") magazine, I happened upon a list of "Feng Shui" suggestions. Though intrigued, I've never pursued the idea or thought of it---I have a style and I like it. :) But, I read something that struck me so much and completely applied to my life! The finality of accomplishing "feng shui" in your home, is the energy flow and peace. It was then I realized that sometimes my massive efforts of being so in tune with the earth and body, that I leave not-yet finished projects laying around the house, causing bad energy flow. And, WOW. What a vision for me to behold! As I pondered this, and looked about my house, I realized the frustration I feel and failures I feel when I SEE these not-yet finished projects and courageous thoughts and ideas. Though they're good and important things, they're causing a bad energy flow in my home.
Currently, my efforts pertaining just to the baby include: all-natural, organic cloth diapering, which creates sewing projects for wool soakers, knitting projects for wool longies/shorties, loads of laundry, which then need to be folded, put away, etc; feeding her organic food which I prepare myself, which includes farmer's market trips, pureeing and freezing foods, grocery store runs for supplemental needs, making homemade yogurts, etc; making her all cotton baby clothing and adorable shoes; buying cotton socks to turn into homemade BabyLegs, etc. Again, that's just for my baby. Add what I do for me and hubby…and that's where the "selfish" part comes in.
While reading the article, I recognized that I was making so many sacrifices to keep up with these projects, that I was falling behind---constantly. My efforts for doing these things are beyond what's good for our bodies, but extend into our well-being. Though with all my good intentions, our well-being was being sacrificed in favor of what's best for our bodies. Thus, hubby and I decided that I need to cease all projects for one week (making wool diapers, knitting wool longies, making homemade baby foods, etc, etc) only until I am able to get my home back in "feng shui" mode. I'm on day two of this, and I already feel a stronger peace about me, knowing that I am able to get my home re-organized and happy, so that longer-effecting decisions for our bodies can be continued. Thus, once I get my home in a place where the good energy is flowing at a steady pace, I will then be able to flow that good energy back into being my hippie self.
Thus, for the rest of my week hiatus, my daughter may wear a few flushable inserts (gdiapers, of course), eat a few containers of baby food (organic, of course), and hubby and I may *gasp* eat a few meals that aren't the top of my desired list. But, I know that small investments and breaks in life will keep me going with my passions, instead of hitting a burn-out.
This is what makes me a selfish hippie--at the end of the day, I will always put the needs of my family and myself above the needs of doing all hippie things, though my beliefs never fail.
Thursday, July 1, 2010
Making a baby carrier…for different purposes with different fabrics
If I have one talent (ahem, obsession) in life, it's research. Really. It's what I do. I can't lift a finger until I'm convinced it's the right finger to lift. Kind of a problem when you're always convinced that buying so much junk is a waste---especially when you can just make it!!
So, I finally completed my research on...drum roll, please...making carriers! Let's be honest. I mean, really?? There is a plethora of sites out there that tell you how to make a carrier. So, why here? Why me? Because. I'm obsessive. And I've spent so much of my time researching, if one person reads this and days, "hey!! I CAN do that!" Well, then, that's why I'm posting it. :D
FYI: I'm a natural fabrics girl. I like organics. I like the earth. But, well, sometimes cheap is cheap and we get what we can afford. Hence the reason I am a selfish hippie mama.
Here's the reality: making a carrier really is that easy. Stupid easy. In fact, so pathetically easy (and worth it!!!), I've realized all the different uses and fabrics to make them:
- Summer carriers: use cotton gauze, to keep self and baby very cool
- Water carriers: use nylon sport mesh, awesome for taking a baby in the pool, or hanging out in the sprinklers, because it will not be heavy when it gets wet
- Winter carriers: fleece (because it doesn't breathe, it keeps you warm--good for keeping your body heat between you and baby
- Year-round: cotton canvas, breathes easy, washes clean, sturdy, fun fabrics
- It's easy. Really. There are even super-easy no-sew versions.
- Totally worth it.
- Choices are endless…pick your season and purpose, and just go for it!!
Sunday, June 27, 2010
My favorite tracing paper for patterns
I have seen many tracing papers, rather pricey, for sale on various sites. I never learned to make or trace patterns until working on my apparel design degree, and even then…we used medical paper!!
Yep. That tissue paper you sit on when you go the doctor? The one and the same. Super cheap, but durable. Good enough for your bum…even better for your patterns!
Yep. That tissue paper you sit on when you go the doctor? The one and the same. Super cheap, but durable. Good enough for your bum…even better for your patterns!
Sunday, June 20, 2010
Super cute EASY baby shoes!!
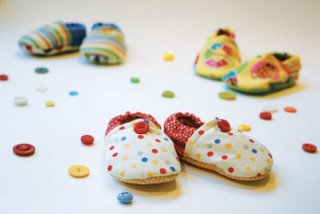
I had this pattern a few weeks, because as usual, I was sure it was much harder than it turned out to be. So, the fabric and pattern sat there ignored…and what a mistake! These are absolutely the EASIEST shoes to put together. I followed the pattern dutifully, but I would definitely make some changes. Here is the link, so you can check it out yourself. Stardust Cloth Shoe Pattern.
Changes for next time:
- Even for my five-month old, these were much too big. I plan to scale the pattern to 75% and try again. They were big everywhere---length, height, elastic---everything.
- For the iron-on interfacing, I should have followed my gut…next time, I will cut the iron-on interfacing 3/8" smaller all the way around the edges; it will make sewing through the layers so much easier!
- Lastly, I would do layered trimming, instead of pinking the edges. I think it will lay flatter when turned inside-out.
Ideas for next time (and things I already changed):
- Since daughter isn't walking, I simply used muslin for the sole
- Also, to save on cute fabric, I did the lining with muslin (it doesn't show)
- For the top-stitching on the foot, I did a decorative stitch---I LOVE it, but I wish I would have done a bolder color
- I think I will do a pair completely in muslin, and do top-stitching in a decorative stitch…cheap, and I can have a variety of fun stitches and colors.
- Lastly…some embroidery on the front foot on a plain fabric would be ADORABLE!
Saturday, June 19, 2010
How to trace (or copy) a pattern and add seam allowance to a pattern

I'm recently becoming intrigued by Ottobre pattern magazine. Of course, like most Euro sewing books, the seam allowance is not included. While once that bugged me, I've come to prefer it. Anyhow, it can be rather intimidating to learn how to trace a pattern, then go back and add seam allowance. I am fortunate enough to have gone to college, and in my case, major in Apparel Design and Merchandising. Apparently, I have a hidden talent for pattern drafting…
Grab a pencil compass (<---any basic art store will have one) and trace the pattern with the compass part. The pencil will automatically drag next to it, creating a pattern tracing with the seam allowance already included! (You are able to adjust the compass to the exact width that you want). How nifty is that??
Monday, June 14, 2010
Homemade Wool Wash
After spending $14.60 for Euclan Wool Wash on Amazon.com, it occurred to me that I could probably make some on my own…yet, again…why don't I think of these things sooner?
Here's what I used:
Here's what I used:
- Lavender-scented castile soap (from Trader Joe's)
- Lansolin lanolin (bought at babies-r-us)
- 1 cup hot water
Yah. That easy! I heated 1 cup water in the microwave until hot. Dissolved a pea-sized amount of lanolin in the water, then added several drops of castile soap. Mixed it all up, added to a few inches of cool water in a plastic bucket and swished it all around. Put diaper in, allow to soak for at least 15 minutes. Drain water and gently squeeze diaper. Repeat soaking with only cool water. Drain and gently squeeze diaper.
Tada! A clean and lanolized diaper…on the cheap!
Homemade lingerie laundry bag
I've no doubts there are loads of these tutorials online, but it just didn't occur to me to MAKE one until this weekend! I was frustrated because I needed several at once, to use one for each knit cotton diaper I wanted to wash, but delicately. Looking around the house, I discovered the brilliance of using tulle, wrapped around the diaper, then using a clothespin to close it. Since tulle doesn't fray, there's no need to bother sewing it with an edge, and it does great in the washer and dryer. Perfect! And, I saved $7/bag (going price on Amazon.com). Hooray for being a faux domestic diva! :)
Subscribe to:
Posts (Atom)

